DIY Aquarium Rack Build Journal

aquachris

Well Known
Member
Messages
1,198
I am starting this post to be for my DIY aquarium rack build.

Here are the rough plans:
1598135114364.png

Here is the supplies... gotta figure out how to turn below into above LOL! I have some gas cans behind it... Maybe if I get super frustrated with the build......
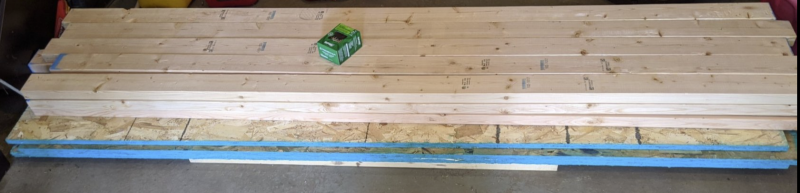
1598135144434.png

Today (2020-08-22) I just worked on getting the area cleaned up and ready for building in my garage.

So did some cutting on Saturday night and got this much done...
Excuse the mess, but its in a garage LOL
1598228460183.png

So here's my Sunday's adventure:
Cut rest of wood
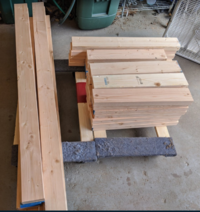
1598228499825.png

Built the first Shelf.. It was when I started this, I realized I messed up on the width.. I was going to make the total width 24", but the pieces in the middle I was short an inch (Was supposed to cut 21.5, but I ended up cutting at 20.5). All good though, still deep enough for most of what I want... I wanted to go 24.5" deep just in case I ever decided to do a 20 gallon sideways, but now my depth is only 23.5"... Oh well, I can still put 10's sideways, and still have tons of options for tanks in the future, or if I ever decide to custom size an aquarium.. who knows. Either way it was enough wood, and I was already committed and decided I'll be fine.

Took about an hour to figure it out.
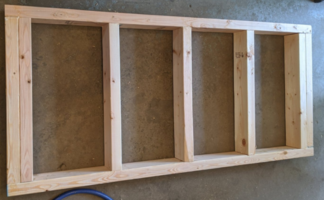
1598228746290.png

Built second shelf in much much less time
1598228844886.png
And now third and final shelf.. definitely had it down by this one
1598228884914.png

After that, I added the side braces, and started building up to the second shelf and put in the supports. By the time I completed it was time to call it enough for the day, so more in the future!
1598228939715.png
Oh had to weight test it of course.. this is with the third shelf I used to make sure I was pushing down onto the support studs when I built it. Forgive my dirty knees and legs LOL - I had to get on the garage floor quite a bit to build the bottom up, and level everything.
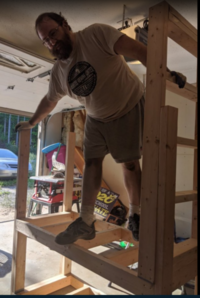
1598229075890.png
I do have some supports to add to the bottom in the middle. Just ran out of time.
 

Advertisement
This is bad news, but a big learning experience. The pathway through the building is often the limiting factor in a design. I found that out the hard way with a refrigerator, which will live out the rest of it's life in the garage. I do feel bad for you, it is a pretty stand. You may try placing the cuts in areas where you can easily re-attach. It may mean using a hacksaw or a jig saw with a metal cutting blade that will cut the wood and the screws. You may be able to do minimal deconstruction and put it back together and hide the cuts. Hopefully you can find a way.
 

Advertisement
Sorry to hear that man it looked nice, how about you save it and maybe set it up elsewhere later?
Or maybe even possibly sell it if it's a last resort. Build something else that will be purpose built for that specific room?
I had smaller issues when I made my metal stand but it was much easier to fix.
Don't let it discourage you to try again.
If it were me I'd be start the negotiating telling the wife it doesn't fit and it's already built so might as well use it somewhere else.
Me, i'd already put it somewhere else. But then again, my credo "it's easier to beg forgiveness than ask for permission"
 

Advertisement
Oh man, I read the whole thread. For it to come to this end must have been disappointing indeed.
I know I was. haha.

It looks awesome though.
 
  • Thread Starter
  • #55
Lol. I tried to come with alternatives but couldn't convince the wife. But honestly I really want it in the room I'm putting it in as that is my office/fish room. It's the place I spend a lot of time so it would be ideal.

I am trying one more thing. I might be able to still get it into a separate section for the top to reattach. It may be a trick to get it touched up and won't be as nice after but better than just chopping it off. So I'm hopeful again.
 
  • Thread Starter
  • #56
I BROKE THROUGH! MY IDEA WORKED. (Sorry for the yelling, but I'm stoked)

Oh also, while doing this, I've been Plasti-dipping the back of my 75 gallon. WOW that took a lot more cans than I expected. For future knowledge if anyone tackles one - 3 cans at least. I went a bit more just because - well, thats what I do. LOL. Pics will come later, waiting for final coat to dry. I'll try to remember to get one before I tape it off where the back is as trim is my next target.
 

Advertisement
I BROKE THROUGH! MY IDEA WORKED. (Sorry for the yelling, but I'm stoked)

Oh also, while doing this, I've been Plasti-dipping the back of my 75 gallon. WOW that took a lot more cans than I expected. For future knowledge if anyone tackles one - 3 cans at least. I went a bit more just because - well, thats what I do. LOL. Pics will come later, waiting for final coat to dry. I'll try to remember to get one before I tape it off where the back is as trim is my next target.
Do we get the happy dance video?
 
  • Thread Starter
  • #60
The deed is done, they are in two, now gotta get my list together for reassembly and repair. Gonna just lag bolt them together once placed inside.
1602259083757.png
 

Advertisement


  • Thread Starter
  • #62
What about some metal brackets as well to support ?
Along the 2 2x4's that I finally got to split and separate, I plan on putting 4 lag screws through that (from the outside) maybe 2-1/2" so that it is almost the full length of the two 2x4s. I didn't plan on metal plates on the sides, I could, but I'm not sure its necessary (and I really dont want it visible, already struggling with lag screws). Since the weight bearing of the unit is along the 2x4s on the inside (if you look at the base and where the wood is sticking up compared to the one next to it) - I plan on making sure those are supporting and taking the weight again, so that it goes all the way to the ground again. Think that will be good enough?

I do plan on some metal bracing though for the single 2x4 in the middle back of the rack, really no choice on that one unless I want to redo the whole piece - but I'm out of good 2x4's that are long enough.
 
Along the 2 2x4's that I finally got to split and separate, I plan on putting 4 lag screws through that (from the outside) maybe 2-1/2" so that it is almost the full length of the two 2x4s. I didn't plan on metal plates on the sides, I could, but I'm not sure its necessary (and I really dont want it visible, already struggling with lag screws). Since the weight bearing of the unit is along the 2x4s on the inside (if you look at the base and where the wood is sticking up compared to the one next to it) - I plan on making sure those are supporting and taking the weight again, so that it goes all the way to the ground again. Think that will be good enough?

I do plan on some metal bracing though for the single 2x4 in the middle back of the rack, really no choice on that one unless I want to redo the whole piece - but I'm out of good 2x4's that are long enough.
Aslong as you feel comfortable with the integrity of the stand go for it!
 
  • Thread Starter
  • #64
Aslong as you feel comfortable with the integrity of the stand go for it!
Yeah I'll be testing it when its all said and done the best I can (get up there myself and shake it, maybe I'll dance like that animated gif earlier, just with no recordings) LOL.
 
  • Thread Starter
  • #66
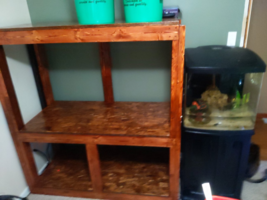
It has made it into the office. Still have to get hardware and start doing repair.
1602283759677.png
Also looking at this pic makes me remember the outlet behind it... The circuit for it is on the left of it. Gotta figure out what to do with the existing circuit, kinda looks exposed there and my purpose is not to use it...
 
It has made it into the office. Still have to get hardware and start doing repair.
View attachment 736213
Also looking at this pic makes me remember the outlet behind it... The circuit for it is on the left of it. Gotta figure out what to do with the existing circuit, kinda looks exposed there and my purpose is not to use it...
Can cover it with a plate?
 
  • Thread Starter
  • #68
Can cover it with a plate?
Yea was thinking about doing that... Should decide soon before I cant move the rack lol.
 
Yea was thinking about doing that... Should decide soon before I cant move the rack lol.
Might as well cover it and not risk water splashing
 
  • Thread Starter
  • #70
Might as well cover it and not risk water splashing
For sure.. I'll have to break into it this weekend and do that.. I think I have a cover actually in the garage lol.
 
  • Thread Starter
  • #71
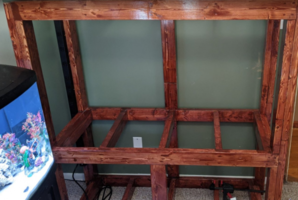
A couple updates... I have the supports on the rack and did the first round of touchups
1602361153461.png

The background is done on the 75.. I was going to paint the trim, but I dont know if I have the energy after all this to do it...
1602361226220.png
 

Advertisement


  • Thread Starter
  • #72
Got some more pics to share..

Rack on its side view

1602370016602.png

And painted top now waiting for that to dry on the 75.... Reveal hopefully tomorrow unless it looks like I need to do another coat (seems to have gone on really nice on the trim, I'm suspecting one coat is enough)
1602370087493.png
 
  • Thread Starter
  • #75
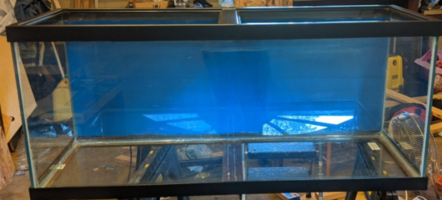
Alright.. some final pics of the rack before its next stage, leveling and stocking!!! As well as my 75gallon's transformation:

1602457099448.png

75gallon before:
1602457153481.png
Background painted
1602457183971.png
Final:
1602457220739.png
 
  • Thread Starter
  • #76
So been busy yesterday and today already. I have moved my biocube over to be next to the rack. I'm now notching out a bit of the wood on the left inside of the rack where the 75 gallon will go... When I did this, I was just a little short on my measurements (I thought the tank trim was 1/4" less than it really was) - and while the tank fits, it was a tight fit. Now that I painted the trim, I want to be careful to try not mess up the trim on the side of it. If I do, I guess no big deal, but figure its worth a shot. So now I'm staining what I cut out, and am waiting for that to dry for the 75's placement.

This is somewhere in the midst of moving the biocube, it was a text to the wife to make sure she approved lol.
1602942628804.png
 
  • Thread Starter
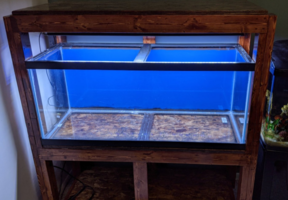
  • #77
Here's with the 75 gallon installed. With all my efforts to try to prevent damaging the paint on the trim, it still happened. Only side you that is seen that's peeled back now is by the biocube, but since the biocube is there, I cant do much unless I move it again... So maybe future touchup project. Otherwise I think it looks decent. It is a bit "peeled" back on the back of it, this was due to my taping to try to do the trim in the back... I originally wasn't going to do it in the back but I had so much paint left I thought I would. Now I see why I shouldnt have bothered lol - again not a big deal because all that section will be hidden thanks to the sand and rock in it.

1602974045915.png
Next steps:
- Level
- Clean sand
- Add live rock
- Add sand
- Add water (trying to figure out best way to setup 75g worth of water to fill it with - I only have a 32 gallon brute, I have a 40g aquarium in use by the live rock, so its going to be interesting).

Then its make sure everything settles, make sure its well cycled then start looking at stocking 75. In the meantime, I will start working on the 10's and stuff.
 
Love the way this turned out. Can't wait to see it full and lit up.
With all my efforts to try to prevent damaging the paint on the trim, it still happened.
When I paint my tanks, I cover the painted sides with clear packing tape, only takes a couple minutes with tape gun. Gets it pretty scratch proof though. If you ever haul that beast out again give it a layer so you don't have to move (due to paint at least) it for years to come lol.
 
  • Thread Starter
  • #79
Love the way this turned out. Can't wait to see it full and lit up.

When I paint my tanks, I cover the painted sides with clear packing tape, only takes a couple minutes with tape gun. Gets it pretty scratch proof though. If you ever haul that beast out again give it a layer so you don't have to move (due to paint at least) it for years to come lol.
Working on lighting today At least for the 75 - So hopefully we can see a good setup - I want to mount the light up on the bottom of the shelf above it... While it could sit on the aquarium itself, I'd rather have the space for working on it, as I'm already space constrained.

Hmmm.. interesting idea.. I just worry about making it look nice with the packing tape on it.... I might give this a whirl if I do it again. Took so much work getting this all done, I dont know if I have the energy to bother at this point But if I ever take it out and redo it, I think thats brilliant idea.
 
  • Thread Starter
  • #80
Light is installed. Now to cleanup the mess I made lol then to clean the sand in the bitter Michigan weather outside .
1603032912890.png
 

Advertisement


  • Thread Starter
  • #82
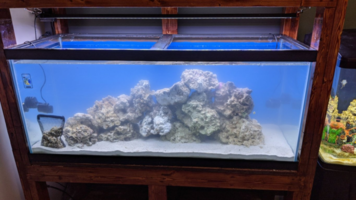
Most recent issue is figuring out how to handle the skimmer for the 75g. I picked one up, but its too big to fit.
 
  • Thread Starter
  • #83
Did some things today - forgive the cloudy, just filled uup.
1603129297107.png
I have a protein skimmer on order... I'm actually planning on using a canister for mechanical filtration. The little bag is just live rock rubble, didn't know what to do with it and figured I might toss it in the canister. Still more work to do, but its getting there!

The canister was one thing I didn't think too far ahead about on how I was going to get to and service it. Might have to give up a spot for a 10 gallon on the bottom, which I'm not too worried about. If I decide to get rid of the biocube next to it, that will give me a place to put it behind the tanks.
 
  • Thread Starter
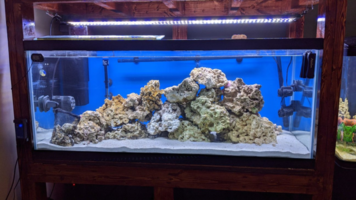
  • #84
So finished up my setup in my 75 gallon salty tank. I added my canister filter and skimmer.
1603546246922.png
Now I'm working on cycling it, which will take some time.

Next up is working on my new snail culture tank (ramshorn and bladder) in the bottom section of the rack. I'm putting 10 gallons sideways next to the canister. Should be pretty simple.. trying to decide if I go bare bottom or throw something in it. Before I threw something in it as I was growing some plants out, but now with my other tanks going, I really have no need to.

Might setup a second tank as well that will be my 10g fw quarantine. Once I get this rack done, I do plan on putting Qt tanks in a different spot (away from my current tanks). Still long way to go, but now that I have things going I'm super stoked!
 
  • Thread Starter
  • #85
Not a whole lot more happened this weekend. Started feeling sick last night, and took it easy the rest of the day. I did get my snail tank up and going and moved a bunch of snails over. Still have more to do.

Today was my normal waterchange day, so that consumed a lot of time, ended up cleaning out the sump on my 210 a bit more than normal, I couldn't believe the number of snails that were in my first compartment (which is where all the yuck is). Tons of baby snails too, my son's pea puffers were well pleased LOL.
 
Advertisement


Advertisement


Advertisement


Back
Top Bottom