
You are using an out of date browser. It may not display this or other websites correctly.
You should upgrade or use an alternative browser.
You should upgrade or use an alternative browser.
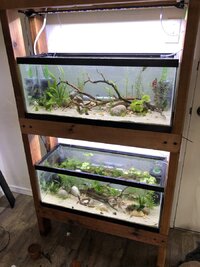
20 gallon long rack. . . changing my whole setup


Advertisement
- Messages
- 16,739
Advertisement
OP

- Messages
- 1,392
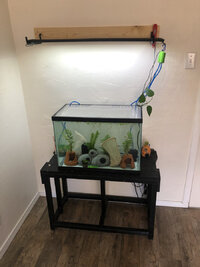
Just simplifying. Lower water volumes, smaller water changes, less frequent water changes, lower temps, smaller feedings etc.
“current” set up like dis:

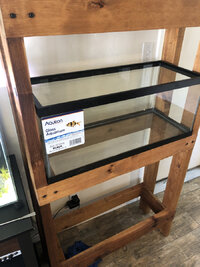
here is some progress on the new stand:

“current” set up like dis:
here is some progress on the new stand:
OP
- Messages
- 1,392

- Messages
- 16,739
Is that what was a pile of unstained wood a couple of of weeks ago? Looks pretty nice!
OP
- Messages
- 1,392
Advertisement


- Messages
- 479


- Messages
- 2,307
OP
- Messages
- 1,392
There will be one on top, rim will sit about 6 foot from the floor, so yeah I need a stool for water changes ha ha. I tried to find a good balance between not having a bottom tank too low, not having a top tank too high, and having enough room in between.
OP
- Messages
- 1,392
Advertisement

- Messages
- 1,198
OP
- Messages
- 1,392
A few small updates. I installed the “air pump hanging mounts”. . . AKA fence handles:

Got some of the sand I’ll be using, but the more and more I read/watch about planting in sand (it isn’t the easiest to plant in) I may mix some thing else into the substrate just to make my life a little easier. . . But not sure:

a sneak peak of some fish (that will hopefully still be alive by the time I finish this thing):

Made some more caves:

Got some of the sand I’ll be using, but the more and more I read/watch about planting in sand (it isn’t the easiest to plant in) I may mix some thing else into the substrate just to make my life a little easier. . . But not sure:
a sneak peak of some fish (that will hopefully still be alive by the time I finish this thing):
Made some more caves:
OP
- Messages
- 1,392
I’m went a bit over budget yesterday. . . But got some more plants, some amonos, and some substrate. Gonna go with a sort of 2 tone looks mostly gravel in back mostly sand in front and mixed in the middle. Also I put the “etched glass” background on:


OP
- Messages
- 1,392


OP
- Messages
- 1,392
Trying to get the electronics/cord management figured out and prepped. I screwed in a bunch of zip tie mounts where I know I’ll need them. . . and might add a few more where I don’t need them just in case. Unfortunately I will need to get some USB extension cords to use with the air pumps, but should still work out:


also, I got kind of lucky after mounting the power strips I realized my Wi-Fi light timers barely fit, and are in the correct orientation so I can access the power button. . . woo!
also, I got kind of lucky after mounting the power strips I realized my Wi-Fi light timers barely fit, and are in the correct orientation so I can access the power button. . . woo!
- Messages
- 1,198
Yeah, getting those powerstrips in before you starting putting in equipment is a definite good idea... Take it from someone who found out the hard way
- Messages
- 16,739
Zip ties are my best friend. Usually pick up a package or two every trip to Harbor Freight.
Are those just little plastic flowerpots?A few small updates. I installed the “air pump hanging mounts”. . . AKA fence handles:
View attachment 769289
Got some of the sand I’ll be using, but the more and more I read/watch about planting in sand (it isn’t the easiest to plant in) I may mix some thing else into the substrate just to make my life a little easier. . . But not sure:
View attachment 769288
a sneak peak of some fish (that will hopefully still be alive by the time I finish this thing):
View attachment 769290
Made some more caves:
View attachment 769339
OP
- Messages
- 1,392


- Messages
- 2,307
Are you going to use glass lids? The reflection back towards the light can be pretty significant, on my tank rack I ended up adding about 20% more than I had originally thought I would need.
That does look very nice, and I love the power strip mounting.
That does look very nice, and I love the power strip mounting.
Advertisement
OP
- Messages
- 1,392
I was planning on using corrugated lexan for the lids, though I wonder if the UV resistance of said material would effect plants?
Yeah I am a bit worried of not having enough light, in fact I planned on using the tank mounts that came with the light so it would sit directly over the tank, but despite being the correct size for the tank the mounts are too long. . . I could always hang the light with wire if need be.
Yeah I am a bit worried of not having enough light, in fact I planned on using the tank mounts that came with the light so it would sit directly over the tank, but despite being the correct size for the tank the mounts are too long. . . I could always hang the light with wire if need be.
- Messages
- 4,640
OP
- Messages
- 1,392
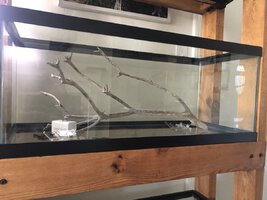
Got my drift wood from manzanitadriftwood.com, I think it was a pretty good deal actually, and I think they will work well my tanks. Also I’m sort of considering doing smaller tanks up top for fry/maybe betta breeding?????


- Messages
- 1,198
OP
- Messages
- 1,392




OP
- Messages
- 1,392
OP
- Messages
- 1,392
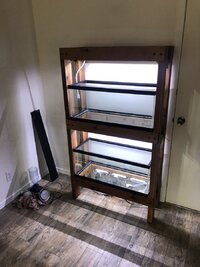
Thanks to everybody who’s watched this thread, and thanks for sticking with it. The “fish“ part is pretty much done. Figured I would show you guys what I’ve done so far and sort of a look at the nitty-gritty stuff. I finished the lids today, think they turned out pretty well I use the new “technique“ for cutting them using a razor blade that I think is meant for cutting carpet, seem to work pretty well. Also I got most of the cords managed, though it will have to change once I set up the top tanks.


The two unused air pumps will feed into the gang valve which will ultimately provide air to the top five tanks. I added the power strip In case I wanted to heat those tanks, but ultimately I think they will just be shrimp which should tolerate the slightly cooler air temperature in the room.


The cords are pretty hidden unless you’re a ground level. . . Also along the way I added some felt pads to the bottom of the stand, Just hoping it will ensure the wait is evenly distributed, my thinking is it’s like the foam padding under a rimless tank.

The two unused air pumps will feed into the gang valve which will ultimately provide air to the top five tanks. I added the power strip In case I wanted to heat those tanks, but ultimately I think they will just be shrimp which should tolerate the slightly cooler air temperature in the room.
The cords are pretty hidden unless you’re a ground level. . . Also along the way I added some felt pads to the bottom of the stand, Just hoping it will ensure the wait is evenly distributed, my thinking is it’s like the foam padding under a rimless tank.
OP
- Messages
- 1,392


- Messages
- 12,262
OP
- Messages
- 1,392
- Messages
- 12,262
Random Great Topic!

Today's Deals
Advertisement
Advertisement
Advertisement