Aquaponic Filter Upgrade!

McFly

Active Member
Member
Messages
247
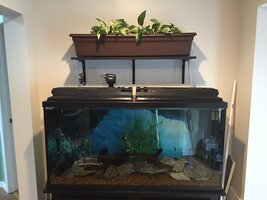
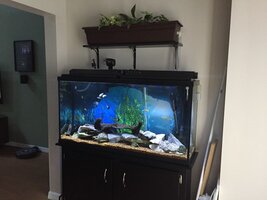
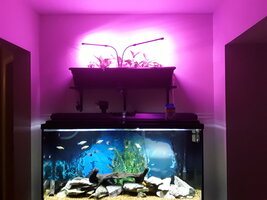
I've been looking to spruce up the fish tank area, and thought a shelf over the aquarium with plants with 'hanging' fauna would be nice. Well... I'm not one to let the plants get off scott free... Everyone pulls their weight in the fish tank area.

My goal is to convert a 36 inch planter into an Aquaponic filter for the tank. I've seen various Youtube vids explaining DIY systems, and started gathering required parts, and re-engineering some aspects to make the system easier to maintain. It also needs to keep some visual appeal because it is in plain sight.
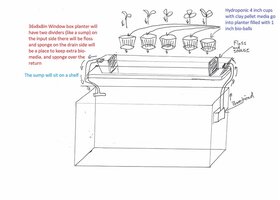
Auqaponic%20filter-L.jpg Here's a rough sketch I made to figure out the basic design. I have (2) 17 inch LED aquarium lights that I will mount over the planter to provide better light for the plants.

The planter will have a power head (Maxi-Jet 600) feeding water on the right side, and a gravity drain on the left side. There will be a partition on either side, floss and filter sponge on the input, on the right side I'll put a bag of biomedia to keep for quarantine filtration when I need it. Maybe a coarse sponge over the exit bulk head.

The main compartment in the center will have 5/6 four inch hydroponic net pots filled with clay bead media for the plants to grow in. I think I'm going to secure one set of net pots to the planter bottom, and then nest (float) a second set of pots with the media and plants in them. This will make it easier to lift plants to trim roots without moving the media around too much.

With the net pots in place, the rest of the center area will be filled with one inch bio-balls. So in theory, the nitrifying bacteria will produce nitrates, and the plants will absorb some of the nitrate. The return hose will feed back into the tank through a tee or an elbow to add what little water movement it can.

This will be a secondary filtration system in addition to my Cascade 1200. The addition of this aquaponic filter will hopefully reduce nitrate levels in the tank. Having 15ppm Nitrate out of the tap should help keep nitrates even lower.

I currently have everything I need to plumb the system. I'm just waiting for the planter, aquaponic media and net pots before I start assembly. I'll continue to post my progress throughout the project.

Should be interesting.
 

Advertisement

Advertisement
  • Thread Starter
  • #3
What kind of plants are you going to use?

I think the middle plants will be Pothos (Devil's Ivy), and the outside plants I may plant some herbs the wife uses frequently, maybe Basil, or Mint. I definitely want something that will crawl over the front and hang down... after that it's a free for all!
 
I think the middle plants will be Pothos (Devil's Ivy), and the outside plants I may plant some
herbs the wife uses frequently, maybe Basil, or Mint. I definitely want something that will crawl over
the front and hang down... after that it's a free for all!
Fresh herbs would be an extra bonus! Very curious to see how this turns out!!
 
  • Thread Starter
  • #5
I get the planter tomorrow, then I can start working on it. Should be a fun project. I'll document my progress here. I've done aquarium builds and projects before, but this is my 1st time delving into Aquaponics. I'm sure there will be hiccups!
 
  • Thread Starter
  • #6
The Planter:

Most of the DIY examples are far from visually appealing, and usually have a planter propped up on the back of the tank on a plank. The planter is usually 'bulging' from the water and media pushing out on the thinner plastic walls of the planter. I'm going to try and take this up a few notches, because it won't be sitting in a fish room. It will be on display in my living room. Making this filter quiet will also be important. It's gotta be sexy and quiet...

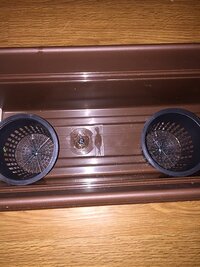
The Aquaponics part of this will be the ability to grow plants in the planter. To make this 'serviceable', the plants are going to be placed in "net pots". They're popular in the hydroponics world, and it will allow me to use clay pellet media in the net pots, keeping the plant and roots easy to remove and replace for root trimming and planting new plants. This will also limit the amount of heavy clay pellet media being used making the whole planter considerably lighter. There will be net pots affixed to the bottom of the planter for the planted net pots to sit in. Surrounding the net pots will be bio-balls for added filtration for the tank.

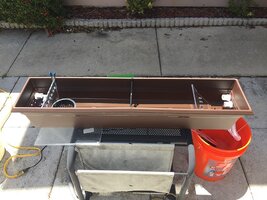
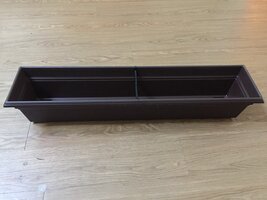
The planter came today. It's very basic, and the wrong color, so I'm going to have to paint it up a bit.

IMG_0549-M.jpg

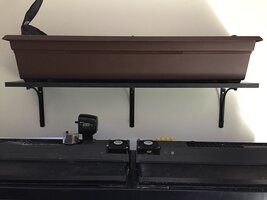
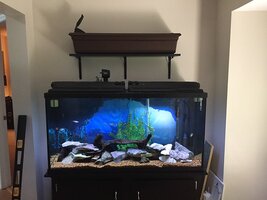
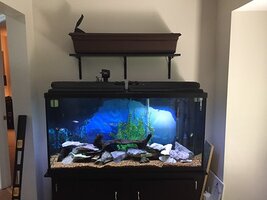
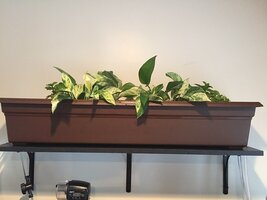
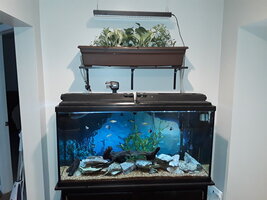
The planter (36 inches long) will go on a shelf over the aquarium. I was fortunate enough to have (3) studs to mount the shelf brackets into, so it will hold the weight. I tested it with 30 lbs of lead and bricks and it didn't budge. Shelf is spot on level.

IMG_0548-M.jpg

IMG_0547-M.jpg

The shelf itself is over 5 ft. high, so this is really geared to me, standing at 6'4" tall, I can still reach into the planter, and a step stool may be needed for any "big" jobs, but I think once that Pothos starts hanging over the front it'll look great!

Back to making that planter an overhead sump...

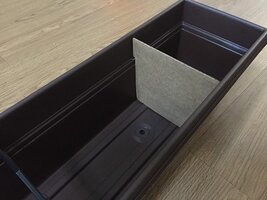
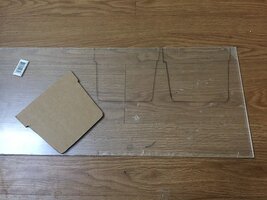
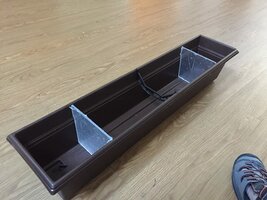
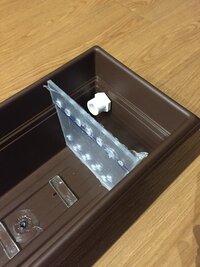
It will need two dividers to make chambers on each end, I cut out a template from cardboard, then transferred the shape onto some acrylic I had in the garage.

IMG_0550-S.jpg IMG_0551-S.jpg

IMG_0553-M.jpg

After some cutting, and trimming I had a (3) chamber sump...

IMG_0554-M.jpg

These partitions will add ridigity to the walls, as well as provide a dedicated space for filter medium at the entry and exit of the sump. I have to wait until the net pots arrive to silicone them in, because they will also set the water height for the middle section. I need everything here before I can proceed with setting them permanently in place.

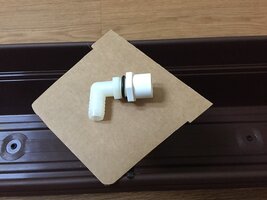
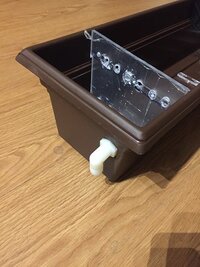
I do have my bulk heads for either side of the sump, but once again, I need all my parts here to measure things out... Here's one of the bulkheads pictured below.

IMG_0552-M.jpg

IMG_0547-S.jpg So there's today's progress!!

Stay tuned!
 

Advertisement
  • Thread Starter
  • #7
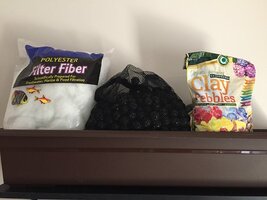
Shipment 1 of 2 showed up today... Poly Filter, Bio balls and clay pebbles.

IMG_0555-M.jpg

Shipment 2 of 2 should be here tomorrow, then building/testing starts!!

Ok... that's a lie... Shipment 2 of 2 is now (2) shipments, soooo I'll have everything on Thursday! Oh well!!
 
  • Thread Starter
  • #8
Finally got the net pots, and now I can start working on this project.

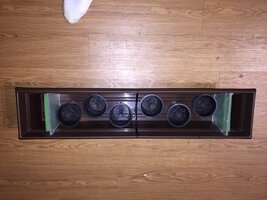
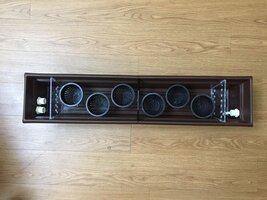
With the floor of the planter uneven, my 1st job is to give the base net pots a stable, level base to be affixed to. A half dozen pieces of acrylic and silicone has taken care of that. I've also taken this opportunity to seal the drain plugs.

IMG_0558-M.jpg

Here's the basic layout for the net pots:

IMG_0556-M.jpg

Going to let the silicone dry, then attach the net pots to the bottom.

Work is a terrible inconvenience, and I'm working tomorrow.... Baby steps...
 
  • Thread Starter
  • #9
Long day at work, not much time to work on the sump.

I did manage to drill for the bulk heads and install them,
and drilled out holes in one of the dividers.

IMG_0559-L.jpg

IMG_0560-M.jpg

Hopefully I can sneak into the shop for a bit before
Easter company gets here tomorrow....
 
  • Thread Starter
  • #10
Got right to it when I woke up, and got quite a bit done.

First I set a mock up with the sump, and a 5 gallon bucket to see if water flow will work properly.... and it didn't. I had to install a second drain to make things flow properly. Found out my powerhead was too powerful so I've got a fountain pump (adjustable flow rate) on it's way. After some feddling, I got the water flow going right... Yea! The adjustable fountain pump will make things

Best guess is I'm running at about 140-160 gph. 2-3 times tank volume per hour. (I also have a Cascade 1200 running as a primary filter) Hopefully it'll be enough to get those nitrates to the plants!

IMG_0561-M.jpg

Now that I know it will work, it's it time to build up the planter section.

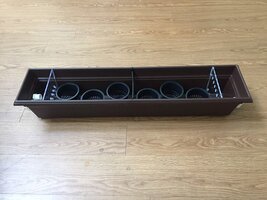
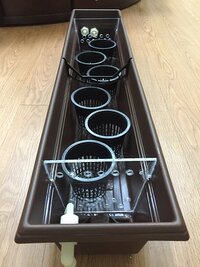
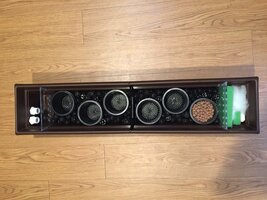
There are 6 net pots that are 'glued' to the floor with aquarium silicone, and 2 section walls for me to add a little pre/post mechanical filtration, and keep some biomedia available for the quarantine tank when it's needed.

IMG_0566-M.jpg

IMG_0570-M.jpg

IMG_0567-M.jpg

The idea is a second set of net pots will rest inside the affixed pots. This way I can lift each plant out to trim roots, and rinse the clay pebbles. I'll put a spacer on the bottom of the affixed pots to raise the planted pots up, so water can circulate through.

That's all for today! It's starting to come together... It'll be 48 hrs before I can move on. (Curing time for Silicone)
 
  • Thread Starter
  • #11
Aquarium silicone has completely cured, and this project is starting to come together.

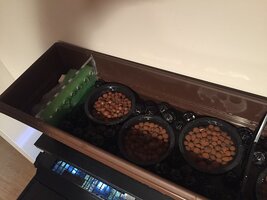
The 'base' net pots are set firmly, so the bio-ball medium went in, which really locked In those net pots. I put some clay pellets in one of the top net pots to show how the planters will look. The floss and sponge is on the input side (from the pump). The output will likely get some sponge and floss to start out because the plant roots will likely be dirty and I'd like to catch that 'stuff'.

IMG_0584-M.jpg

IMG_0585-M.jpg

Next a wet test, to preset pump power and re-leak check. I did have a drip from one of the plugs on the bottom the first time, I (hopefully) resealed it properly.

Then, I need to prep the clay medium in a bucket of tank water with an airstone for a full day (minimum) to clean and saturate it. I also have to go get some plants to start growing. Lastly, I have to install an overflow so if the sump clogs, there's a water outlet back to the tank.

I'm also thinking about a pump cut off switch (optical or float I'm not sure) so the pump just shuts off if the water level gets too high.

An after thought might be a cover for the top, and just leave holes for the net pots.
 

Advertisement


  • Thread Starter
  • #12
Work, work, work... Little time for this project unfortunately.

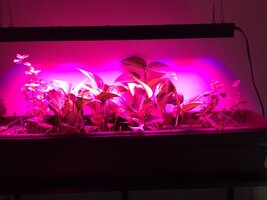
Yesterday I took the clay pebbles out for a bath. They're in a bucket full of tank water with an air stone and a pond pump stirring them around. I'd like them to be fully soaked before I start up the filter.

Going plant shopping tomorrow at the Garden Center. I want to run The system with the new pump and leak check it one last time. Busy day tomorrow, but I'm going to try to get a bunch more done.
 
Work, work, work... Little time for this project unfortunately.

Yesterday I took the clay pebbles out for a bath. They're in a bucket full of tank water with an air stone and a pond pump stirring them around. I'd like them to be fully soaked before I start up the filter.

Going plant shopping tomorrow at the Garden Center. I want to run The system with the new pump and leak check it one last time. Busy day tomorrow, but I'm going to try to get a bunch more done.
Let me know how you like the clay pebbles. I have some media that never sank so I capped it with some gravel and it works but I wasn't impressed.
 
  • Thread Starter
  • #14
Let me know how you like the clay pebbles. I have some media that never sank so I capped it with some gravel and it works but I wasn't impressed.

I have about a 75% sink rate. I knew it wouldn't all sink, so I got extra. I've used it before in a drip hydroponic set up for herbs, and it worked well for me. Of course it's apples and oranges when we compare it to this set up.

I'll put some of the floating pebbles on the bottom of the net pot, then cover them with sinking pebbles, as I set the plant. Then turn the system on to fill up the planter. I have some gravel for weight if needed. Having the base net pots to nestle the planted pots in should make a floating pot little to worry about. (fingers crossed)

I'll be back to it this weekend, hopefully to finish up and get it running.
 
  • Thread Starter
  • #15
Wish I could say I'm up snd running, but.... my pump died. I had a pond pump, but at 400 gph, it's way too powerful. So, another delay.

A new pump will be here Tuesday, as Home Depot's mark up on pond pumps is outrageous. No leaks, which is a good thing.
Delays, delays...
 
  • Thread Starter
  • #16
The overhead sump is running. Not the "permanent" set up, but there's water flowing through it, and aside from a noisy pond pump, I'm satisfied with its function.

The pump is too powerful, so I set up a ball valve on the feed tube to slow the water flow down.... I know, I know.... BAD Marty putting the valve after the pump, but it's temporary, and I really need water moving through that sump.

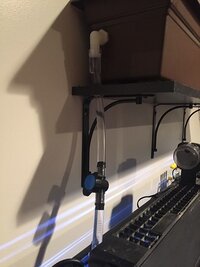
The ball valve/flow control: IMG_0601-M.jpg

The 'way to noisy' pond pump: IMG_0602-M.jpg

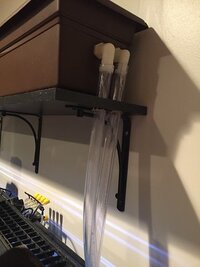
The exit hoses: IMG_0600-M.jpg

Water level is about half way up the lower bulk head, and a quarter up the other bulkhead. Very consistent level that I'm happy with.

The clay pellet media was put in a half full of tank water 5 gallon bucket. I put a powerhead in it, about mid way under water, and pointed it up slightly. Agitating the surface and creating a swirling current in the bucket. That ran for 5 days to get 90% of the media to sink. I put the remaining floating clay pellets on the bottom of the net pots and covered them with sinking clay pellets.

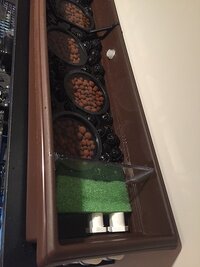
Here's the 'feed side' of the overhead sump: IMG_0598-M.jpg

And the drain side of the sump: IMG_0603-M.jpg

The overflow can be seen on the back above the water line. That will have a hose connected to it... before I go to bed tonite!

The clay pellets are all sunk in their net pots nicely, and ready to receive some plants, which will be put in on Thursday.

The lower power pump will go in on Thursday too. Busy work week, so once again... babysteps... Still, making progress!
 
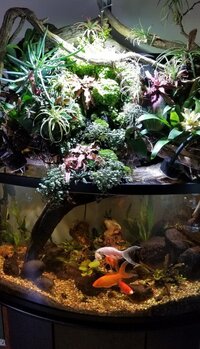
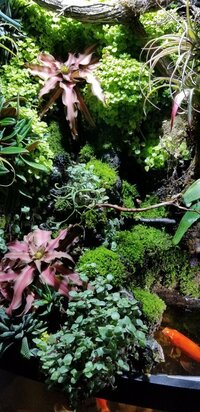
We think alike I had almost identical one about 6 months ago except I used lava rock and it sat on top of tank. Worked fine then became the forest I have today.
 
  • Thread Starter
  • #18
By the way....

That green foam on the drain side is 2 pieces, each one will fit in my
OTB filter for my quarantine tank!

We think alike I had almost identical one about 6 months ago except I used lava rock and it sat on top of tank. Worked fine then became the forest I have today.

Awesome! I like to hear that! Clay pellets were a PITB, but I'm
glad they're working.

What did you plant?
 
WOW! That's Awesome! Great job!
Ended up moving to bio falls in middle and water fall. The original system was like I said identical to yours I just found the plants as interesting as the fish tank so I came up with this second gen. I will say that it is always 0 0 0 readings unless I crank up the thrive. I like where yours is going I might suggest giant baby tears or creeping Jenny. Only thing with creeping Jenny is she will grow down your wall but looks good. Peace lily or any bog plants will work great.
 

Advertisement


  • Thread Starter
  • #22
Ended up moving to bio falls in middle and water fall. The original system was like I said identical to yours I just found the plants as interesting as the fish tank so I came up with this second gen. I will say that it is always 0 0 0 readings unless I crank up the thrive. I like where yours is going I might suggest giant baby tears or creeping Jenny. Only thing with creeping Jenny is she will grow down your wall but looks good. Peace lily or any bog plants will work great.

I have a very good garden center close by. They've got 3 varieties of Pothos in stock,
I'll definitely ask about giant baby tears. I was thinking about a mint plant too... And maybe
the Chinese money plant. Only six net pots... I'm starting to see where you went with yours!

Got home from work (late)...(again) and that 400GPH pump got louder, so out it came.

During work, I was thinking about the project, and I realized a HUGE design flaw.
IF (a very big word) any of the hoses going to the overhead sump were to come off,
or leak in some magical way, the pump, being on the bottom of the tank would drain
the entire tank into the living room.

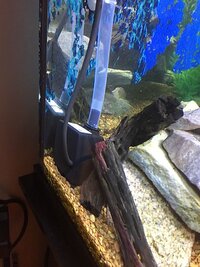
The new pump is positioned about 3 inches from the top of the tank, so IF there's
a catastrophic failure, only a few gallons drain from the tank. I may even make a
float switch for the pump... It'll make water changes easier, one less thing to unplug.

The new pump is MUCH quieter, and it doesn't need to be throttled back at all.
Peace of mind there, as I need not worry about an overfill as much.

I'll post some pics after dinner.
 
Got home from work (late)...(again) and that 400GPH pump got louder, so out it came.

During work, I was thinking about the project, and I realized a HUGE design flaw.
IF (a very big word) any of the hoses going to the overhead sump were to come off,
or leak in some magical way, the pump, being on the bottom of the tank would drain
the entire tank into the living room.

The new pump is positioned about 3 inches from the top of the tank, so IF there's
a catastrophic failure, only a few gallons drain from the tank. I may even make a
float switch for the pump... It'll make water changes easier, one less thing to unplug.

The new pump is MUCH quieter, and it doesn't need to be throttled back at all.
Peace of mind there, as I need not worry about an overfill as much.

I'll post some pics after dinner.
Ya I was in same boat that's why mine sat on tank as then if any failure a quick drain into tank.
 
  • Thread Starter
  • #24
Ya I was in same boat that's why mine sat on tank as then if any failure a quick drain into tank.

I thought about on tank, but wanted the separation, and additional 'hang space' for
plants. Once the set up has the kinks worked out, I'll make hose connections less
unreliable. The worst case scenario at this point is less than 5 gallons, which I'll
confess, has happened during a water change once. Vinyl tile flooring helped tons!

Tomorrow is planting day!! It all comes together. I have a light set up I'm working on
for the plants. Getting excited...

I'm planted! Probably the cheapest part of the build.
$4.99 for (1) Pothos plant
$2.49 for (1) Spearmint Plant

System is running at 100 GPH which should be adequate circulation.

I pulled the Pothos out of the pot it was purchased in. Pulled the plant
apart, flushed all the dirt out of the roots, and divided the individual
rooted stalks into 4 net pots.

Same for the spearmint plant, except that got divided into (2) net pots.

57911888443__17B74403-9773-487D-AD3D-42AECC439BCE-M.jpg

57911890245__CAF9B99A-A06E-47AB-894E-58B73BED0951-M.jpg

IMG_0606-M.jpg

IMG_0609-M.jpg

Now to see if it works...

I'm going to find a 36" grow light to mount above the sump... My lighting idea
doesn't seem like it's going to work. Oh well.
 
  • Thread Starter
  • #25
IMG_0612-XL.jpg

Tank lights on... Looks nice. I've ordered a timed clip on grow light from
Amazon for now... It should do the job until I figure out a more permanent solution.

(Still got some cleaning up to do on the right... pardon the pile!)
 
  • Thread Starter
  • #26
So.... !!?

I've had the system running for just over 24 hours. I might add flawlessly.
My weekly water change is done on Saturday night or Sunday. It's Friday,
I decided to do a test on the water for giggles... just to see. I wasn't expecting
to see much, it's only a day, right?
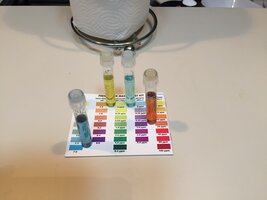
pH: 7.6
Ammonia: 0 ppm
Nitrite: 0 ppm
Nitrate: 5-10 ppm.

Nitrate is NEVER that low in my tank. It tests higher than that after a water change. (~20 ppm)
It's usually about 40 ppm without the Aquaponic filter this time of the week.

So..... it works! Much better than I expected I might add.

I'm going to continue water changes, because nitrates aren't the ONLY reason
for water changes, and it this point, I'll bee feeding the plants with my nitrate
rich (treated) tap water.

Awesome.
 
  • Thread Starter
  • #27
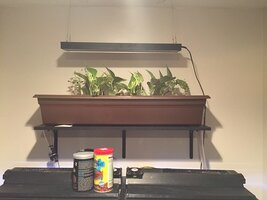
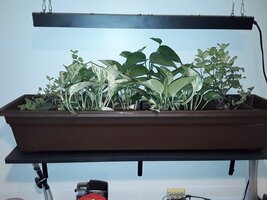
A temporary grow light (thanks Amazon) is now in place. My goal
is to put in a 36" ceiling fixture, but for now the plants will get the
light they need.
20190511_202544-L.jpg

I think this project has proved itself worth the design and work. Short term
it has literally 'Wowed' me with the effectiveness this set up has shown.
Adding the aquaponic filtration to the automated evaporative cooling system
has provided a very stable, healthy environment for my aquarium inhabitants.

I'm hoping the Mint plants aren't too aggressive... I'll have to watch them closely
in the beginning. I know they could quickly take over the whole sump. For now...
... I'm looking forward to a mint julip or two!
 
This is awesome! Love the dedication and thorough updates you did! Did you install a third drain Incase your filter media gunks up and the water stops flowing? That would be my only concern with the way you have the filter media set up.
 
  • Thread Starter
  • #29
This is awesome! Love the dedication and thorough updates you did! Did you install a third drain Incase your filter media gunks up and the water stops flowing? That would be my only concern with the way you have the filter media set up.

Thanks. Yes, there is a 3rd drain located in the middle of the back wall,
one inch from the top. It drains back into the tank.

The flow is pretty much unrestricted, took a few hours to get
it all right. I'm looking into a float kill switch as an added measure.
I'm stunned at how fast the system took effect.
 
Thanks. Yes, there is a 3rd drain located in the middle of the back wall,
one inch from the top. It drains back into the tank.

The flow is pretty much unrestricted, took a few hours to get
it all right. I'm looking into a float kill switch as an added measure.
I'm stunned at how fast the system took effect.


Right! Same here! The plants I’m using are all clippings with very little root systems. I’m hoping once they establish more roots I will see the same effect you are!
 
  • Thread Starter
  • #31
Right! Same here! The plants I’m using are all clippings with very little root systems. I’m hoping once they establish more roots I will see the same effect you are!

Pretty sure you will get similar results. A single 4 inch pot Pothos plant
was $5, and had about 12-15 rooted stalks... iffin' ya want to get faster
results. I wish I had the room for a larger set up like you're building.
 

Advertisement


Pretty sure you will get similar results. A single 4 inch pot Pothos plant
was $5, and had about 12-15 rooted stalks... iffin' ya want to get faster
results. I wish I had the room for a larger set up like you're building.
I had bought an $8 pothos that had lots of cuttings in it, I than also made my own clippings. To fit the plants in the light diffuser I had to cut a lot of the roots down.
 
  • Thread Starter
  • #33
I had bought an $8 pothos that had lots of cuttings in it, I than also made my own clippings. To fit the plants in the light diffuser I had to cut a lot of the roots down.

Gotcha. I would've cut the diffuser, only because the plant won't get any smaller, and as the plant grows it will need room 'to grow'. Just an idea, but if you stacked 2 diffusers you could cut bigger holes and just slide them to open the holes bigger as needed. You should only need one side to be adjustable, to keep the plant from falling in.

Anyway you bake it, it still ends up as bread... and I'm sure you'll end up with an efficient system. You seem to have put a bunch of design and effort into your project.
 
Gotcha. I would've cut the diffuser, only because the plant won't get any smaller, and as the plant grows it will need room 'to grow'. Just an idea, but if you stacked 2 diffusers you could cut bigger holes and just slide them to open the holes bigger as needed. You should only need one side to be adjustable, to keep the plant from falling in.

Anyway you bake it, it still ends up as bread... and I'm sure you'll end up with an efficient system. You seem to have put a bunch of design and effort into your project.

I like it! Shutter design! Lol.

I’ve built a few Aquaponic s systems in the past and have learned from my mistakes. This is the easiest and cheapest design with my current set up.
 
This was a great read all the way through! You should consider maybe making a more detailed breakdown on paper for anyone who may be interested in replicating!

I feel like Fishlore should have a saved section for projects like these if it doesn’t already. One day I will live somewhere permanently enough we’re I can construct something like this for now my plants will just hang inside the tank haha. I would be interested to see what a version of this for a much smaller tank could look like! Awesome job!
 
  • Thread Starter
  • #36
Thanks!

I actually do have a "parts list", and I'd be happy to post it up. A lot of the 'engineering' was done on the fly, and with materials that were available. Sizing pump to drain and flow rate, is changed by so many variables, that a set in stone blueprint wouldn't be possible. Just raising or lowering the shelf height will change everything.

I would say that I've hopefully given enough insight to enable those capable of building one to do so. I'll post some specs to further assist prospective Overhead Aquaponic Sump designers.

Parts:

(1) 36 inch window style planter without a drain tray.
(drain tray models are far more work to make watertight)
(1) 36 inch shelf with (3) shelf brackets
5 ft of 3/4 in I.D. vinyl hose (drain)
5 ft of 1/2 in I.D. vinyl hose (straight fit to feed pump)
(12) 3.75 inch heavy duty net pots
(1) 2 lb. bag of clay pebbles
200-300 1 inch bio balls
(3) 3/4 inch PVC pipe couplers w/ one inside threaded end
(3) 3/4 inch nylon elbows threaded end to barbed end
(1) package of 3/4 in I.D. o-rings
(1) 3/4 ID to 1/2 ID barbed reducer
(1) 1/2 in ID plastic ball valve w/ barbed ends
(1) tube of Aquarium Silicone Sealant
(2) fabricated dividing walls (acrylic/lexan)
(1) 120 GPH 6w pond pump (for ~18 inch head height)

Optional parts:
(1) 3/8 in nylon elbow w/ 5 ft vinyl hose (for overflow... your choice!)
Open cell foam filter media
Aquarium floss filter media
Grow light for plants

Tools that make life easier:
Stepped drill bit
A drill (had to mention it...)
rat tail file
utility knife
pipe cutter
 
  • Thread Starter
  • #37
TIPS:

Want it quiet?

--Extend drain hoses an inch or two below tank water level. Some like the "water fall" noise... I have fountain to supply that, I like the fish tank QUIET! --Get a pump that closely meets your needs. Throttling water flow usually makes a pump noisier.

Water level:

Set your water level to a 1/2 inch taller than your net pot height. A good water flow should come up about 1/3 to 1/2 of the drain bulk heads. The diameter of the (lower) bulkhead hole should be very close to the waterline of the sump. Use a bio ball or two under the planted net pot to raise it up a bit, and allow more water flow around the planted net pot. The top of the planted net pot should be at or just under the water line. Clay pellets should always stay wet.

Keep it simple:

This design allows you to lift the planted net pot out of the sump completely, then plop it right back in again. You'll have to do this to trim and examine roots as well as flush the net pots occasionally. This will limit plant size somewhat and keep plants healthy. This is a filtration system, not a garden, keep it in check.

This overhead sump will also add more bio-filtration, increases water volume and could very well make a great low power filter for power outages. (6w) gets you a filter and aeration, as well as nitrate reduction.

UNPLUG your pump BEFORE water changes... your heater too.... neither should be run dry!

Building:

Clean up every bulk head hole you drill. Keep the hole drilled only as big as the bulkhead, it shouldn't be easy to push the bulkhead through, there should be resistance. Place o-ring on the INSIDE of the sump wall. Apply silicone to the bulkhead before installing, once in, put the o-ring on, the screw the coupler on tight... firmly hand tight should be sufficient.

Test your work BEFORE you put it into operation. CLOSELY watch the water level. You do not want this overflowing.. no fun in that. Make sure there is no leaking. I had to silicone the drain plugs on my planter, and one leaked the first time. MAKE SURE THE SUMP WORKS SAFELY! WITHOUT LEAKS!
 
  • Thread Starter
  • #38
25% water change last night (15Gal) I didn't mix RO/DI water in this time, so the tank got full tap nitrates. Water test the next day:

IMG_0613-L.jpg

So Nitrates are pretty solid between 10 and 20 ppm. This is where it would be after a water change any way, but before the filter upgrade the nitrates would've been above 40ppm prior to the water change.

Picked a few dead leaves from the mint plants (expected), and I have root growth below the net pots on both mint plants, that's about 3 days. Anxious to see how those mint plants do.
 
  • Thread Starter
  • #39
About 2 weeks in, give or take, and the Pothos is growing like weeds. I am seeing growth in the spearmint too, but not healthy growth, lower leaves are browning, and the spearmint plants are growing tall and skinny with little leaf development. Either they're reaching for light (insufficient lighting) or there's a nutrient issue. All the plants have grown about an inch or two taller, and roots are coming through the bottoms of the net pots already.

The set up has really worked well. It's whisper quiet, nice to look at, and has been performing better than expected.

I have a bigger and better 100w grow light ordered. We'll see if it's a light issue.

The tank is doing extremely well. Last night's Nitrate test read under 10 ppm. Closer to 5 ppm actually. The added biofiltration has made nitrite and ammonia GONE! I'm still doing weekly water changes at about 20%...
 
About 2 weeks in, give or take, and the Pothos is growing like weeds. I am seeing
growth in the spearmint too, but not healthy growth, lower leaves are browning,
and the spearmint plants are growing tall and skinny with little leaf development.
Either they're reaching for light (insufficient lighting) or there's a nutrient issue.
All the plants have grown about an inch or two taller, and roots are coming through
the bottoms of the net pots already.

The set up has really worked well. It's whisper quiet, nice to look at, and has
been performing better than expected.

I have a bigger and better 100w grow light ordered. We'll see if it's a light issue.

The tank is doing extremely well. Last night's Nitrate test read under 10 ppm.
Closer to 5 ppm actually. The added biofiltration has made nitrite and ammonia
GONE! I'm still doing weekly water changes at about 20%...


Awesome dude! Sounds like it’s taking off!

When plants get spindly they’re considered light stretched. Adding the light should help.

I did an update video on my pothos if you want to check it out!

 
  • Thread Starter
  • #41
Great results! Your plants are really taking off. Good idea cutting down the grate, with the size of your tank, you won't need enough plants to fill that whole grate. You've got a good set up, I wish I had room for a proper sump, but alas I do not.

IMG_0636-M.jpg

I've upgraded to a 100w LED grow light, which I've set up with a timer to go on at 7am, and off at 6pm. I'm going to start on "VEG MODE", and watch for results. It also has a 'full spectrum' mode and a 'bloom' mode.... one's gotta work!

I've also 're-engineered' the basement with a better APC multi-outlet set up that organized wires a bit, removed a couple of extension cords and multi outlets, and allowed for (2) timers. One for tank lights and the other for sump grow lights. The aquarium is ever evolving.

I think the next upgrade is a cover for the overhead sump. Still have to let things run a while 'as is', but the wheels are turning.

A kitchen remodel will hamper fun time till mid-June, so I'm glad I got everything set to run for minimal attention. Water changes and glass cleaning for a few weeks....
 

Advertisement


T
Great results! Your plants are really taking off. Good idea cutting down the grate, with the size of your tank, you won't need enough plants to fill that whole grate. You've got a good set up, I wish I had room for a proper sump, but alas I do not.
I've upgraded to a 100w LED grow light, which I've set up with a timer to go on at 7am, and off at 6pm. I'm going to start on "VEG MODE", and watch for results. It also has a 'full spectrum' mode and a 'bloom' mode.... one's gotta work!

With the growth I have now I have not seen my nitrates rise at all! It’s nice to have the peace of mind of knowing I won’t have a nitrate problem anymore!

I’m always looking for improvements. You sound like me with the wheels turning as to how to perfect the system!

Did you get a high pressure sodium or metal halide light for your plants?
 
  • Thread Starter
  • #43
It's a 100w Full Spectrum LED Grow light. Need to stay away from hot lamps.... Already fighting high water temperature with evaporative cooling so LED is the best option....

 
It's a 100w Full Spectrum LED Grow light. Need to stay away from
hot lamps.... Already fighting high water temperature with evaporative
cooling so LED is the best option....
That’s not a bad price for that!

I’ll have to keep that in mind when I set up my Aquaponics indoors.
 
  • Thread Starter
  • #45
IMG_0637-M.jpg

LOTS more light, that's for darned sure. I've upped the timer to 11 hrs/day for now. I'm hoping the mint kicks into 'leaf mode' with the added 'full spectrum' light.
 
LOTS more light, that's for darned sure. I've upped the timer to 11 hrs/day for now.
I'm hoping the mint kicks into 'leaf mode' with the added 'full spectrum' light.
The mint could also be adjusting to its new aquaponic life. Assuming you bought it potted some plants react differently.
 
  • Thread Starter
  • #47
The new grow light seems to be the fix. Mint plants are starting to grow more (and fuller) leaves, and the Pothos is going crazy. It's the heat of the summer in Fla. now, so the evaporative cooling system has kicked in big time. To the tune of at least 1-2 gallons a day, so I'm going to try JUST replenishing lost water, because Nitrates are 5 ppm and topping the tank should replace other trace elements.

For the summer, it should be one monthly 25% water change and daily topping off with a mix of RO/DI and treated water. I'll be putting 10-15 gallons a week to keep the water level up, so I'll keep an eye on it all and react as needed.

The Aquaponic filter is seemingly a resounding success. Now it's a matter of working out how to work with the new system.
 
  • Thread Starter
  • #49
20190616_182436-L.jpg

20190616_182517-L.jpg

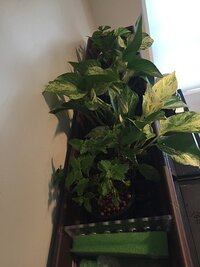
Well, I guess the plants are acclimated now. These photos are taken after a handful of mint was trimmed off each side. New sprigs and leaves have grown in under 24 hours from the trimmed plants. Pothos is growing like weeds too. The Nitrate levels are a rock steady 5-10 ppm, with only water top offs for the last 2 weeks due to house disruption from a full kitchen remodel. I'll get a 25% water change in this week. Fish seem content with the lower nitrates.

I'll be trimming roots soon, as they're starting to really grow out of the net pots. I may have to trim the Pothos too.... getting crowded.

Going to cut back grow light from 11 to 10 hours daily too.
 
For herbs that drape, you might consider creeping thyme, oregano, prostrate rosemary, and any mint- chocolate, pineapple, orange. Lemon verbena would also be a nice addition! I’ll be following, because I want to do something similar!
 

Random Great Topic!

Advertisement


Advertisement


Advertisement


Back
Top Bottom