Filter disperses the co2 output entirely, is it good?

Sagi

Active Member
Member
Messages
252
I know the answer is "Yes, this is excellent. Having your filter fully disperse the CO2 output is exactly what you want in a planted aquarium.
When CO2 bubbles are completely broken down or pushed throughout the tank by the filter's flow, it means the gas is dissolving efficiently into the water rather than escaping into the air. This gives your plants the best possible access to the carbon they need to grow."

However most online sources show perfectly undisturbed co2 cullomn from the diffuser.

Obviously I placed the diffuser aligned on the opposite side of the filter

I only wondering about this now, since I just EVENTUALLY switched from diy to sodastream pressurized co2 system, so I pity about such strong beautiful stream of co2 to not be distributed as expected :)

What's the preferred method then?
 

Advertisement
Despite the perfectly undisturbed CO2 columns you see, I think blowing the CO2 around the tank does a better job at raising the CO2 concentration in your water...just as the quote you shared stated. Good water movement also helps keep the concentrations of CO2 more consistent throughout your tank. If you have still water that allows for that perfect little stream of bubbles, the water around the diffusor may have significantly more CO2 than the water on the other side of the tank.

My preferred method is decent water flow.
 

Advertisement
  • Thread Starter
  • #3
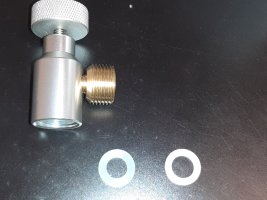
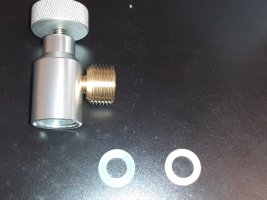
Well, system wasn't connected properly so initially the adapter wasn't tight strong enough to the regulator, only by hand, so I used a spanner and the lfs approved this is ok now. However the other main leak is between the brass elbow adapter and the sodastream cylinder, for the simple reason washer wasn't fit correctly. So here are the two washers I received with the adapter, initially I inserted the soft rubber, which created a leak, so what I just did was to insert the hard white plastic washer upon the soft one, I don't know if this is what I should have done, but it looks like pressure not dropping, this to be validate in the next few days.

What basically happened, as I understand it, is that only moderate force is required to pair the adapter to the cylinder. If the adapter is over-tightened it may cause the O-ring in the adapter to be squeezed into the valve of the cylinder preventing the gas from flowing.

That is, if using the soft washer. I didn't need or have to put the hard gasket after the soft one, but put it instead of the soft one..

That learning curve got me to empty an entire new bottle into the air

Any suggestions?
 

Attachments

  • 20261014_195835.jpg
    20261014_195835.jpg
    389.7 KB · Views: 16
  • Thread Starter
  • #4
Well, for anyone who interested just an update, that fixed the leak on the cylinder side, and no pressure dropping anymore, staying steady on ~1000psi

The only thing now is just with all the preliminary handling of the system, the regulator slightly dropped to the floor and the bubble counter Absorbed a slight hit and water were leaking a bit, so I opened it and the spring and rubber bead popped up, I would have tried to reassemble them, however they were disappeared beneath the partially accessible counter which the tank is placing on, I tried some instruments to bring them out, but not finding them.

So a new bubble counter with solenoid has been ordered, so I manually meanwhile open and close the needle valve till it arrives.
 
Well, for anyone who interested just an update, that fixed the leak on the cylinder side, and no pressure dropping anymore, staying steady on ~1000psi

The only thing now is just with all the preliminary handling of the system, the regulator slightly dropped to the floor and the bubble counter Absorbed a slight hit and water were leaking a bit, so I opened it and the spring and rubber bead popped up, I would have tried to reassemble them, however they were disappeared beneath the partially accessible counter which the tank is placing on, I tried some instruments to bring them out, but not finding them.

So a new bubble counter with solenoid has been ordered, so I manually meanwhile open and close the needle valve till it arrives.
That’s unfortunate. I also had some mishaps when I fiddled with my regulator so I sure will try to avoid it as much as possible from now on.
 
  • Thread Starter
  • #6
Well, now that I finished with that CO2 stabilization (I was running diy for 2-3 years, so this is a huge thing), I would like to optimize my water circulation. So here's the components: only one internal filter and powerhead connected to a two rows spray bar. how to optimize planted aquarium water circulation with only one internal filter and one powerhead connected to a two rows spray bar diagram ?

For a long time the setup has been filter on right pane and spray bar on left pane horizontally mounted with the powerhead on the substrate level on the opposite side of the filter.

I recently changed that, with the spray bar staying where it was, and filter moved to left pane just above the powerhead to complement it and no cross counter the stream.

In previous setup there were extreme turbulence in the middle of the tank and stagnant sections.
 

Advertisement
You never statted the type of filter you have in your tank. If you have a hang on back or canister filter, much of the CO2 might be expelled at the water surface where it does no good. If you have an internal filter, then the water flow will help. As aaaaadddddddddsos often the case, "the devil is in the details."
 
  • Thread Starter
  • #8
I have stated it's an internal filter + powerhead connected through a long tubing from substrate level into a two rows spray bar just alongside the filter.
 
  • Thread Starter
  • #9
Update

I have the answer, I believe

The hard white Teflon gasket will go into the w21-8 female nut of the adapter ONLY if there wasn't a already pre installed O-Ring on the Regulator Stem

Otherwise there is no use for it

The soft silicone rubber washer will fitt into the tr 21 4 adapter nut

Now, this rubber washer is insufficient, that's why the o ring gasket as shown in the picture is coming into use.
 

Attachments

  • images (1).jpeg
    images (1).jpeg
    4.1 KB · Views: 5
  • 20261014_195835.jpg
    20261014_195835.jpg
    389.7 KB · Views: 5
Advertisement


Advertisement


Advertisement


Back
Top Bottom